Tampilkan postingan dengan label HTML Basic. Tampilkan semua postingan

Jumat, 28 September 2012

HTML Blocks

HTML Block Elements

Most HTML elements are defined as block level elements or as inline elements.
Block level elements normally start (and end) with a new line when displayed in a browser.
Examples: <h1>, <p>, <ul>, <table>

HTML Inline Elements

Inline elements are normally displayed without starting a new line.
Examples: <b>, <td>, <a>, <img>

The HTML <div> Element

The HTML <div> element is a block level element that can be used as a container for grouping other HTML elements.
 The <div> element has no special meaning. Except that, because it is a block level element, the browser will display a line break before and after it.
When used together with CSS, the <div> element can be used to set style attributes to large blocks of content.
Another common use of the <div> element, is for document layout. It replaces the "old way" of defining layout using tables. Using tables is not the correct use of the <table> element. The purpose of the <table> element is to display tabular data.

The HTML <span> Element

The HTML <span> element is an inline element that can be used as a container for text.
The <span> element has no special meaning.
When used together with CSS, the <span> element can be used to set style attributes to parts of the text.

HTML Grouping Tags


HTML Iframes

Syntax for adding an iframe:

<iframe src="URL"></iframe> 
 
The URL points to the location of the separate page.

Iframe - Set Height and Width

The height and width attributes are used to specify the height and width of the iframe.
The attribute values are specified in pixels by default, but they can also be in percent (like "80%").

Example

<iframe src="demo_iframe.htm" width="200" height="200"></iframe>


Iframe - Remove the Border

The frameborder attribute specifies whether or not to display a border around the iframe.
Set the attribute value to "0" to remove the border:

Example

<iframe src="demo_iframe.htm" frameborder="0"></iframe>


Use iframe as a Target for a Link

An iframe can be used as the target frame for a link.
The target attribute of a link must refer to the name attribute of the iframe:

Example

<iframe src="demo_iframe.htm" name="iframe_a"></iframe>
<p><a href="http://rickyrizkys.blogspot.com" target="iframe_a">rickyrizkys</a></p>


HTML iframe Tag


HTML Image

HTML Images - The <img> Tag and the Src Attribute

In HTML, images are defined with the <img> tag. 
The <img> tag is empty, which means that it contains attributes only, and has no closing tag.
To display an image on a page, you need to use the src attribute. Src stands for "source". The value of the src attribute is the URL of the image you want to display.

Syntax for defining an image:
<img src="url" alt="some_text"> 
 
The URL points to the location where the image is stored. An image named "boat.gif", located in the "images" directory on "www.w3schools.com" has the URL: http://www.w3schools.com/images/boat.gif.
The browser displays the image where the <img> tag occurs in the document. If you put an image tag between two paragraphs, the browser shows the first paragraph, then the image, and then the second paragraph.

HTML Images - The Alt Attribute

The required alt attribute specifies an alternate text for an image, if the image cannot be displayed.
The value of the alt attribute is an author-defined text:

<img src="boat.gif" alt="Big Boat">
 
The alt attribute provides alternative information for an image if a user for some reason cannot view it (because of slow connection, an error in the src attribute, or if the user uses a screen reader).

HTML Images - Set Height and Width of an Image

The height and width attributes are used to specify the height and width of an image.
The attribute values are specified in pixels by default:

<img src="pulpit.jpg" alt="Pulpit rock" width="304" height="228">
 
Tip: It is a good practice to specify both the height and width attributes for an image. If these attributes are set, the space required for the image is reserved when the page is loaded. However, without these attributes, the browser does not know the size of the image. The effect will be that the page layout will change during loading (while the images load).

Basic Notes - Useful Tips

Note: If an HTML file contains ten images - eleven files are required to display the page right. Loading images takes time, so my best advice is: Use images carefully.
Note: When a web page is loaded, it is the browser, at that moment, that actually gets the image from a web server and inserts it into the page. Therefore, make sure that the images actually stay in the same spot in relation to the web page, otherwise your visitors will get a broken link icon. The broken link icon is shown if the browser cannot find the image.


HTML Image Tags

Kamis, 27 September 2012

HTML TABEL

HTML Tables

Tables are defined with the <table> tag.
A table is divided into rows (with the <tr> tag), and each row is divided into data cells (with the <td> tag). td stands for "table data," and holds the content of a data cell. A <td> tag can contain text, links, images, lists, forms, other tables, etc.

Table Example

<table border="1">
<tr>
<td>row 1, cell 1</td>
<td>row 1, cell 2</td>
</tr>
<tr>
<td>row 2, cell 1</td>
<td>row 2, cell 2</td>
</tr>
</table> 

How the HTML code above looks in a browser:
row 1, cell 1 row 1, cell 2
row 2, cell 1 row 2, cell 2


HTML Tables and the Border Attribute

If you do not specify a border attribute, the table will be displayed without borders. Sometimes this can be useful, but most of the time, we want the borders to show.
To display a table with borders, specify the border attribute:
<table border="1">
<tr>
<td>Row 1, cell 1</td>
<td>Row 1, cell 2</td>
</tr>
</table>


HTML Table Headers

Header information in a table are defined with the <th> tag.
All major browsers display the text in the <th> element as bold and centered.
<table border="1">
<tr>
<th>Header 1</th>
<th>Header 2</th>
</tr>
<tr>
<td>row 1, cell 1</td>
<td>row 1, cell 2</td>
</tr>
<tr>
<td>row 2, cell 1</td>
<td>row 2, cell 2</td>
</tr>
</table>
How the HTML code above looks in your browser:


Header 1Header 2
row 1, cell 1row 1, cell 2
row 2, cell 1row 2, cell 2


HTML Table Tags


HTML Elements


HTML Elements

HTML documents are defined by HTML elements.

HTML Elements 

An HTML element is everything from the start tag to the end tag: 


* The start tag is often called the opening tag. The end tag is often called the closing tag.

HTML Element Syntax

  • An HTML element starts with a start tag / opening tag
  • An HTML element ends with an end tag / closing tag
  • The element content is everything between the start and the end tag
  • Some HTML elements have empty content
  • Empty elements are closed in the start tag
  • Most HTML elements can have attributes
Tip: You will learn about attributes in the next chapter of this tutorial.

Nested HTML Elements

Most HTML elements can be nested (can contain other HTML elements).
HTML documents consist of nested HTML elements.

HTML Document Example

The example above contains 3 HTML elements.

HTML Example Explained

The <p> element:


The <p> element defines a paragraph in the HTML document.
The element has a start tag <p> and an end tag </p>.
The element content is: This is my first paragraph.

The <body> element:

The <body> element defines the body of the HTML document.
The element has a start tag <body> and an end tag </body>.
The element content is another HTML element (a p element).

The <html> element:

The <html> element defines the whole HTML document.
The element has a start tag <html> and an end tag </html>.
The element content is another HTML element (the body element).

Don't Forget the End Tag

Some HTML elements might display correctly even if you forget the end tag:


The example above works in most browsers, because the closing tag is considered optional.
Never rely on this. Many HTML elements will produce unexpected results and/or errors if you forget the end tag .

Empty HTML Elements

HTML elements with no content are called empty elements.
<br> is an empty element without a closing tag (the <br> tag defines a line break).
Tip: In XHTML, all elements must be closed. Adding a slash inside the start tag, like <br />, is the proper way of closing empty elements in XHTML (and XML).

HTML Tip: Use Lowercase Tags

HTML tags are not case sensitive: <P> means the same as <p>. Many web sites use uppercase HTML tags.

HTML Editor

Writing HTML Using Notepad or TextEdit

HTML can be edited by using a professional HTML editor like:
  • Adobe Dreamweaver
  • Microsoft Expression Web
  • CoffeeCup HTML Editor
However, for learning HTML we recommend a text editor like Notepad (PC) or TextEdit (Mac). We believe using a simple text editor is a good way to learn HTML.
Follow the 4 steps below to create your first web page with Notepad.

Step 1: Start Notepad

To start Notepad go to:
Start
    All Programs
        Accessories
            Notepad


Step 2: Edit Your HTML with Notepad

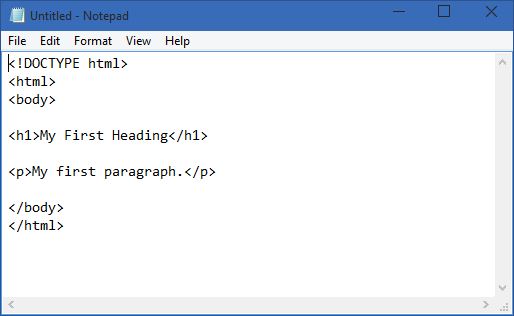
Type your HTML code into your Notepad:
Notepad

Step 3: Save Your HTML

Select Save as.. in Notepad's file menu.
When you save an HTML file, you can use either the .htm or the .html file extension. There is no difference, it is entirely up to you.
Save the file in a folder that is easy to remember.

Step 4: Run the HTML in Your Browser

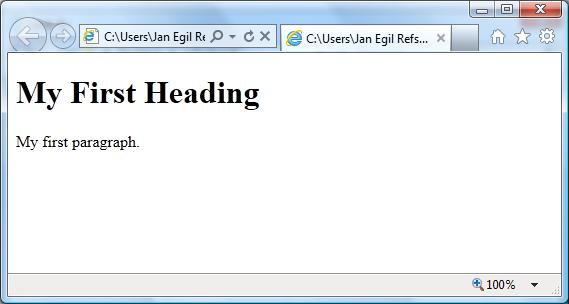
Start your web browser and open your html file from the File, Open menu, or just browse the folder and double-click your HTML file.
The result should look much like this:
View in Browser

HTML Basic

HTML Basic - 4 Examples


HTML Headings

HTML headings are defined with the <h1> to <h6> tags.

Example

<h1>This is a heading</h1>
<h2>This is a heading</h2>
<h3>This is a heading</h3>


HTML Paragraphs

HTML paragraphs are defined with the <p> tag.

Example

<p>This is a paragraph.</p>
<p>This is another paragraph.</p>


HTML Links

HTML links are defined with the <a> tag.

Example

<a href="http://rickyrizkys.blogspot.com">This is a link</a> 

Note: The link address is specified in the href attribute.
(You will learn about attributes in a later chapter of this tutorial).

HTML Images

HTML images are defined with the <img> tag.

Example

<img src="rickyrizkys.jpg" width="104" height="142"> 
Note: The filename and the size of the image are provided as attributes.