Tampilkan postingan dengan label CSS. Tampilkan semua postingan

Sabtu, 29 September 2012

CSS Padding

Padding

The padding clears an area around the content (inside the border) of an element. The padding is affected by the background color of the element.
The top, right, bottom, and left padding can be changed independently using separate properties. A shorthand padding property can also be used, to change all paddings at once.

Possible Values

Value Description
length Defines a fixed padding (in pixels, pt, em, etc.)
% Defines a padding in % of the containing element


Padding - Individual sides

In CSS, it is possible to specify different padding for different sides:

Example

padding-top:25px;
padding-bottom:25px;
padding-right:50px;
padding-left:50px;


Padding - Shorthand property

To shorten the code, it is possible to specify all the padding properties in one property. This is called a shorthand property.
The shorthand property for all the padding properties is "padding":

Example

padding:25px 50px;


The padding property can have from one to four values.
  • padding:25px 50px 75px 100px;
    • top padding is 25px
    • right padding is 50px
    • bottom padding is 75px
    • left padding is 100px

  • padding:25px 50px 75px;
    • top padding is 25px
    • right and left paddings are 50px
    • bottom padding is 75px

  • padding:25px 50px;
    • top and bottom paddings are 25px
    • right and left paddings are 50px

  • padding:25px;
    • all four paddings are 25px


All CSS Padding Properties


CSS Margin

Margin

The margin clears an area around an element (outside the border). The margin does not have a background color, and is completely transparent.
The top, right, bottom, and left margin can be changed independently using separate properties. A shorthand margin property can also be used, to change all margins at once.

Possible Values

Value Description
auto The browser calculates a margin
length Specifies a margin in px, pt, cm, etc. Default value is 0px
% Specifies a margin in percent of the width of the containing element
inherit Specifies that the margin should be inherited from the parent element
 It is possible to use negative values, to overlap content.

Margin - Individual sides

In CSS, it is possible to specify different margins for different sides:

Example

margin-top:100px;
margin-bottom:100px;
margin-right:50px;
margin-left:50px;


Margin - Shorthand property

To shorten the code, it is possible to specify all the margin properties in one property. This is called a shorthand property.
The shorthand property for all the margin properties is "margin":

Example

margin:100px 50px;


The margin property can have from one to four values.
  • margin:25px 50px 75px 100px;
    • top margin is 25px
    • right margin is 50px
    • bottom margin is 75px
    • left margin is 100px

  • margin:25px 50px 75px;
    • top margin is 25px
    • right and left margins are 50px
    • bottom margin is 75px

  • margin:25px 50px;
    • top and bottom margins are 25px
    • right and left margins are 50px

  • margin:25px;
    • all four margins are 25px


All CSS Margin Properties


CSS Box Model

The CSS Box Model

All HTML elements can be considered as boxes. In CSS, the term "box model" is used when talking about design and layout.
The CSS box model is essentially a box that wraps around HTML elements, and it consists of: margins, borders, padding, and the actual content.
The box model allows us to place a border around elements and space elements in relation to other elements.
The image below illustrates the box model:

CSS box-model Explanation of the different parts:
  • Margin - Clears an area around the border. The margin does not have a background color, it is completely transparent
  • Border - A border that goes around the padding and content. The border is affected by the background color of the box
  • Padding - Clears an area around the content. The padding is affected by the background color of the box
  • Content - The content of the box, where text and images appear
In order to set the width and height of an element correctly in all browsers, you need to know how the box model works.

Width and Height of an Element

Remark Important: When you set the width and height properties of an element with CSS, you just set the width and height of the content area. To calculate the full size of an element, you must also add the padding, borders and margins.
The total width of the element in the example below is 300px:
width:250px;
padding:10px;
border:5px solid gray;
margin:10px;
Let's do the math:
250px (width)
+ 20px (left and right padding)
+ 10px (left and right border)
+ 20px (left and right margin)
= 300px
Assume that you had only 250px of space. Let's make an element with a total width of 250px:

Example

width:220px;
padding:10px;
border:5px solid gray;
margin:0px;


The total width of an element should be calculated like this:
Total element width = width + left padding + right padding + left border + right border + left margin + right margin
The total height of an element should be calculated like this:
Total element height = height + top padding + bottom padding + top border + bottom border + top margin + bottom margin

Browsers Compatibility Issue

IE8 and earlier versions of IE, included padding and border in the width property.
To fix this problem, add a <!DOCTYPE html> to the HTML page.

CSS Styling Tables

The look of an HTML table can be greatly improved with CSS:


Table Borders

To specify table borders in CSS, use the border property.
The example below specifies a black border for table, th, and td elements:

Example

table, th, td
{
border: 1px solid black;
}


Notice that the table in the example above has double borders. This is because both the table and the th/td elements have separate borders.
To display a single border for the table, use the border-collapse property.

Collapse Borders

The border-collapse property sets whether the table borders are collapsed into a single border or separated:

Example

table
{
border-collapse:collapse;
}
table,th, td
{
border: 1px solid black;
}


Table Width and Height

Width and height of a table is defined by the width and height properties.
The example below sets the width of the table to 100%, and the height of the th elements to 50px:

Example

table
{
width:100%;
}
th
{
height:50px;
}


Table Text Alignment

The text in a table is aligned with the text-align and vertical-align properties.
The text-align property sets the horizontal alignment, like left, right, or center:

Example

td
{
text-align:right;
}


The vertical-align property sets the vertical alignment, like top, bottom, or middle:

Example

td
{
height:50px;
vertical-align:bottom;
}


Table Padding

To control the space between the border and content in a table, use the padding property on td and th elements:

Example

td
{
padding:15px;
}


Table Color

The example below specifies the color of the borders, and the text and background color of th elements:

Example

table, td, th
{
border:1px solid green;
}
th
{
background-color:green;
color:white;
}

CSS Styling Font

CSS Font Families

In CSS, there are two types of font family names:
  • generic family - a group of font families with a similar look (like "Serif" or "Monospace")
  • font family - a specific font family (like "Times New Roman" or "Arial")
Generic family Font family Description
Serif Times New Roman
Georgia
Serif fonts have small lines at the ends on some characters
Sans-serif Arial
Verdana
"Sans" means without - these fonts do not have the lines at the ends of characters
Monospace Courier New
Lucida Console
All monospace characters have the same width
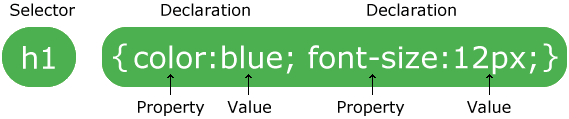

Font Family

The font family of a text is set with the font-family property.
The font-family property should hold several font names as a "fallback" system. If the browser does not support the first font, it tries the next font.
Start with the font you want, and end with a generic family, to let the browser pick a similar font in the generic family, if no other fonts are available.
Note: If the name of a font family is more than one word, it must be in quotation marks, like font-family: "Times New Roman".
More than one font family is specified in a comma-separated list:

Example

p{font-family:"Times New Roman", Times, serif;}


Font Style

The font-style property is mostly used to specify italic text.
This property has three values:
  • normal - The text is shown normally
  • italic - The text is shown in italics
  • oblique - The text is "leaning" (oblique is very similar to italic, but less supported)

Example

p.normal {font-style:normal;}
p.italic {font-style:italic;}
p.oblique {font-style:oblique;}


Font Size

The font-size property sets the size of the text.
Being able to manage the text size is important in web design. However, you should not use font size adjustments to make paragraphs look like headings, or headings look like paragraphs.
Always use the proper HTML tags, like <h1> - <h6> for headings and <p> for paragraphs.
The font-size value can be an absolute, or relative size.
Absolute size:
  • Sets the text to a specified size
  • Does not allow a user to change the text size in all browsers (bad for accessibility reasons)
  • Absolute size is useful when the physical size of the output is known
Relative size:
  • Sets the size relative to surrounding elements
  • Allows a user to change the text size in browsers
If you do not specify a font size, the default size for normal text, like paragraphs, is 16px (16px=1em).

Set Font Size With Pixels

Setting the text size with pixels gives you full control over the text size:

Example

h1 {font-size:40px;}
h2 {font-size:30px;}
p {font-size:14px;}


The example above allows Internet Explorer 9, Firefox, Chrome, Opera, and Safari to resize the text.
Note: The example above does not work in IE, prior version 9.
The text can be resized in all browsers using the zoom tool (however, this resizes the entire page, not just the text).

Set Font Size With Em

To avoid the resizing problem with older versions of Internet Explorer, many developers use em instead of pixels.
The em size unit is recommended by the rickyrizkys.
1em is equal to the current font size. The default text size in browsers is 16px. So, the default size of 1em is 16px.
The size can be calculated from pixels to em using this formula: pixels/16=em

Example

h1 {font-size:2.5em;} /* 40px/16=2.5em */
h2 {font-size:1.875em;} /* 30px/16=1.875em */
p {font-size:0.875em;} /* 14px/16=0.875em */


In the example above, the text size in em is the same as the previous example in pixels. However, with the em size, it is possible to adjust the text size in all browsers.
Unfortunately, there is still a problem with older versions of IE. The text becomes larger than it should when made larger, and smaller than it should when made smaller.

Use a Combination of Percent and Em

The solution that works in all browsers, is to set a default font-size in percent for the <body> element:

Example

body {font-size:100%;}
h1 {font-size:2.5em;}
h2 {font-size:1.875em;}
p {font-size:0.875em;}


Our code now works great! It shows the same text size in all browsers, and allows all browsers to zoom or resize the text!


All CSS Font Properties
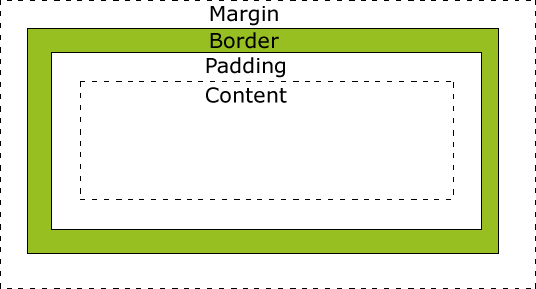


CSS Styling Text

Text Alignment

The text-align property is used to set the horizontal alignment of a text.
Text can be centered, or aligned to the left or right, or justified.
When text-align is set to "justify", each line is stretched so that every line has equal width, and the left and right margins are straight (like in magazines and newspapers).

Example

h1 {text-align:center;}
p.date {text-align:right;}
p.main {text-align:justify;} 

Text Decoration

The text-decoration property is used to set or remove decorations from text.
The text-decoration property is mostly used to remove underlines from links for design purposes:

Example

a {text-decoration:none;}


It can also be used to decorate text:

Example

h1 {text-decoration:overline;}
h2 {text-decoration:line-through;}
h3 {text-decoration:underline;}
h4 {text-decoration:blink;}


 It is not recommended to underline text that is not a link, as this often confuses users.

Text Transformation

The text-transform property is used to specify uppercase and lowercase letters in a text.
It can be used to turn everything into uppercase or lowercase letters, or capitalize the first letter of each word.

Example

p.uppercase {text-transform:uppercase;}
p.lowercase {text-transform:lowercase;}
p.capitalize {text-transform:capitalize;}


Text Indentation

The text-indentation property is used to specify the indentation of the first line of a text.

Example

p {text-indent:50px;} 


All CSS Text Properties


CSS Styling Background

Background Color

The background-color property specifies the background color of an element.
The background color of a page is defined in the body selector:

Example

body {background-color:#b0c4de;}


With CSS, a color is most often specified by:
  • a HEX value - like "#ff0000"
  • an RGB value - like "rgb(255,0,0)"
  • a color name - like "red"
Look at CSS Color Values for a complete list of possible color values.
In the example below, the h1, p, and div elements have different background colors:

Example

h1 {background-color:#6495ed;}
p {background-color:#e0ffff;}
div {background-color:#b0c4de;}


Background Image

The background-image property specifies an image to use as the background of an element.
By default, the image is repeated so it covers the entire element.
The background image for a page can be set like this:

Example

body {background-image:url('paper.gif');}


Below is an example of a bad combination of text and background image. The text is almost not readable:

Example

body {background-image:url('bgdesert.jpg');}


Background Image - Repeat Horizontally or Vertically

By default, the background-image property repeats an image both horizontally and vertically.
Some images should be repeated only horizontally or vertically, or they will look strange, like this: 

Example

body
{
background-image:url('gradient2.png');
}


If the image is repeated only horizontally (repeat-x), the background will look better:

Example

body
{
background-image:url('gradient2.png');
background-repeat:repeat-x;
}


Background Image - Set position and no-repeat

Remark When using a background image, use an image that does not disturb the text.
Showing the image only once is specified by the background-repeat property:

Example

body
{
background-image:url('img_tree.png');
background-repeat:no-repeat;
}


In the example above, the background image is shown in the same place as the text. We want to change the position of the image, so that it does not disturb the text too much.
The position of the image is specified by the background-position property:

Example

body
{
background-image:url('img_tree.png');
background-repeat:no-repeat;
background-position:right top;
}


Background - Shorthand property

As you can see from the examples above, there are many properties to consider when dealing with backgrounds.
To shorten the code, it is also possible to specify all the properties in one single property. This is called a shorthand property.
The shorthand property for background is simply "background":

Example

body {background:#ffffff url('img_tree.png') no-repeat right top;}


When using the shorthand property the order of the property values is:
  • background-color
  • background-image
  • background-repeat
  • background-attachment
  • background-position
It does not matter if one of the property values is missing, as long as the ones that are present are in this order.

All CSS Background Properties


CSS Id and Class

The id and class Selectors

In addition to setting a style for a HTML element, CSS allows you to specify your own selectors called "id" and "class".

The id Selector

The id selector is used to specify a style for a single, unique element.
The id selector uses the id attribute of the HTML element, and is defined with a "#".
The style rule below will be applied to the element with id="para1":

Example

#para1
{
text-align:center;
color:red;
}


Remark Do NOT start an ID name with a number! It will not work in Mozilla/Firefox.

The class Selector

The class selector is used to specify a style for a group of elements. Unlike the id selector, the class selector is most often used on several elements.
This allows you to set a particular style for many HTML elements with the same class.
The class selector uses the HTML class attribute, and is defined with a "."
In the example below, all HTML elements with class="center" will be center-aligned:

Example

.center {text-align:center;}


You can also specify that only specific HTML elements should be affected by a class.
In the example below, all p elements with class="center" will be center-aligned:

Example

p.center {text-align:center;}

CSS Syntax

CSS Syntax

A CSS rule has two main parts: a selector, and one or more declarations:

The selector is normally the HTML element you want to style.
Each declaration consists of a property and a value.
The property is the style attribute you want to change. Each property has a value.

CSS Example

A CSS declaration always ends with a semicolon, and declaration groups are surrounded by curly brackets:
p {color:red;text-align:center;}
To make the CSS more readable, you can put one declaration on each line, like this:

Example

p
{
color:red;
text-align:center;
}


CSS Comments

Comments are used to explain your code, and may help you when you edit the source code at a later date. Comments are ignored by browsers.
A CSS comment begins with "/*", and ends with "*/", like this:
/*This is a comment*/
p
{
text-align:center;
/*This is another comment*/
color:black;
font-family:arial;
}

CSS Introduction

What You Should Already Know

Before you continue you should have a basic understanding of the following:
  • HTML / XHTML


What is CSS?

  • CSS stands for Cascading Style Sheets
  • Styles define how to display HTML elements
  • Styles were added to HTML 4.0 to solve a problem
  • External Style Sheets can save a lot of work
  • External Style Sheets are stored in CSS files

CSS Demo

An HTML document can be displayed with different styles:

Styles Solved a Big Problem

HTML was never intended to contain tags for formatting a document.
HTML was intended to define the content of a document, like:
<h1>This is a heading</h1>
<p>This is a paragraph.</p>
When tags like <font>, and color attributes were added to the HTML 3.2 specification, it started a nightmare for web developers. Development of large web sites, where fonts and color information were added to every single page, became a long and expensive process.
To solve this problem, the World Wide Web Consortium (W3C) created CSS.
In HTML 4.0, all formatting could be removed from the HTML document, and stored in a separate CSS file.
All browsers support CSS today.

CSS Saves a Lot of Work!

CSS defines HOW HTML elements are to be displayed.
Styles are normally saved in external .css files. External style sheets enable you to change the appearance and layout of all the pages in a Web site, just by editing one single file!