Minggu, 30 September 2012

PHP MySQL Connect to a Database

Create a Connection to a MySQL Database

Before you can access data in a database, you must create a connection to the database.
In PHP, this is done with the mysql_connect() function.

Syntax


Example

In the following example we store the connection in a variable ($con) for later use in the script. The "die" part will be executed if the connection fails:


Closing a Connection

The connection will be closed automatically when the script ends. To close the connection before, use the mysql_close() function:

PHP Forms

PHP Form Handling

The most important thing to notice when dealing with HTML forms and PHP is that any form element in an HTML page will automatically be available to your PHP scripts.

Example

The example below contains an HTML form with two input fields and a submit button:


When a user fills out the form above and clicks on the submit button, the form data is sent to a PHP file, called "welcome.php":
"welcome.php" looks like this:
Output could be something like this:


The PHP $_GET and $_POST variables will be explained in the next chapters.

Form Validation

User input should be validated on the browser whenever possible (by client scripts). Browser validation is faster and reduces the server load.
You should consider server validation if the user input will be inserted into a database. A good way to validate a form on the server is to post the form to itself, instead of jumping to a different page. The user will then get the error messages on the same page as the form. This makes it easier to discover the error.

PHP $_GET Variable

The $_GET Variable

The predefined $_GET variable is used to collect values in a form with method="get"
Information sent from a form with the GET method is visible to everyone (it will be displayed in the browser's address bar) and has limits on the amount of information to send.

Example


The "welcome.php" file can now use the $_GET variable to collect form data (the names of the form fields will automatically be the keys in the $_GET array):


When to use method="get"?

When using method="get" in HTML forms, all variable names and values are displayed in the URL.
Note: This method should not be used when sending passwords or other sensitive information!
However, because the variables are displayed in the URL, it is possible to bookmark the page. This can be useful in some cases.
Note: The get method is not suitable for very large variable values. It should not be used with values exceeding 2000 characters.

PHP Syntax

Basic PHP Syntax

A PHP script always starts with <?php and ends with ?>. A PHP script can be placed anywhere in the document.
On servers with shorthand-support, you can start a PHP script with <? and end with ?>.
For maximum compatibility, we recommend that you use the standard form (<?php) rather than the shorthand form.


A PHP file must have a .php extension.
A PHP file normally contains HTML tags, and some PHP scripting code.
Below, we have an example of a simple PHP script that sends the text "Hello World" back to the browser:


Each code line in PHP must end with a semicolon. The semicolon is a separator and is used to distinguish one set of instructions from another.
There are two basic statements to output text with PHP: echo and print.
In the example above we have used the echo statement to output the text "Hello World".

Comments in PHP

In PHP, we use // to make a one-line comment or /* and */ to make a comment block:


JavaScript Boolean Object

Complete Boolean Object Reference

For a complete reference of all the properties and methods that can be used with the Boolean object.
The reference contains a brief description and examples of use for each property and method!

Create a Boolean Object

The Boolean object represents two values: "true" or "false".
The following code creates a Boolean object called myBoolean:


If the Boolean object has no initial value, or if the passed value is one of the following:
  • 0
  • -0
  • null
  • ""
  • false
  • undefined
  • NaN
the object is set to false. For any other value it is set to true (even with the string "false")!

JavaScript String Object

String Object


The String object is used to manipulate a stored piece of text.
Examples of use:
The following example uses the length property of the String object to find the length of a string:

var txt="Hello world!";
document.write(txt.length);
 
The code above will result in the following output:

12
 
The following example uses the toUpperCase() method of the String object to convert a string to uppercase letters:

var txt="Hello world!";
document.write(txt.toUpperCase());
 
The code above will result in the following output:

HELLO WORLD!


Special Characters

The backslash (\) can be used to insert apostrophes, new lines, quotes, and other special characters into a string.
Look at the following JavaScript code:

var txt="We are the so-called "Vikings" from the north.";
document.write(txt);
 
In JavaScript, a string is started and stopped with either single or double quotes. This means that the string above will be chopped to: We are the so-called
To solve this problem, you must place a backslash (\) before each double quote in "Viking". This turns each double quote into a string literal:

var txt="We are the so-called \"Vikings\" from the north.";
document.write(txt);
 
JavaScript will now output the proper text string: We are the so-called "Vikings" from the north.
The table below lists other special characters that can be added to a text string with the backslash sign:


JavaScript Numbers

JavaScript Numbers

JavaScript numbers can be written with, or without decimals:

Example

var pi=3.14;    // Written with decimals
var x=34;       // Written without decimals
Extra large or extra small numbers can be written with scientific (exponent) notation:

Example

var y=123e5;    // 12300000
var z=123e-5;   // 0.00123


All JavaScript Numbers are 64-bit

JavaScript is not a typed language. Unlike many other programming languages, it does not define different types of numbers, like integers, short, long, floating-point etc.
All numbers in JavaScript are stored as 64-bit (8-bytes) base 10, floating point numbers.

Precision

Integers (numbers without a period or exponent notation) are considered accurate up to 15 digits.
The maximum number of decimals is 17, but floating point arithmetic is not always 100% accurate:

Example

var x=0.2+0.1;


Octal and Hexadecimal

JavaScript interprets numeric constants as octal if they are preceded by a zero, and as hexadecimal if they are preceded by a zero and and x.

Example

var y=0377;
var z=0xFF;

lamp Never write a number with a leading zero, unless you want an octal conversion. 

JavaScript Variables

 JavaScript Variables


Variables are "containers" for storing information:

JavaScript Data Types

var answer1="He is called 'Johnny'";
var answer2='He is called "Johnny"';
var pi=3.14;

var x=123;

var y=123e5;
var z=123e-5;

var cars=new Array("Saab","Volvo","BMW");
var person={firstname:"John", lastname:"Doe", id:5566};


Like School Algebra

Remember algebra from school?
x=5
y=6
z=x+y
Do you remember that letters (like x) can be used to hold a value (like 5), and that you can use the information above to calculate the value of z to be 11?
These letters are called variables, and variables can be used to hold values (x=5) or expressions (z=x+y).
lamp Think of variables as names or labels given to values.


JavaScript Variables

As with algebra, JavaScript variables are used to hold values or expressions.
Variable can have a short names, like x and y, or more descriptive names, like age, sum, or, totalvolume.
JavaScript variables can also be used to hold text values, like: name="John Doe".
Here are the rules for JavaScript variable names:
  • Variable names are case sensitive (y and Y are two different variables)
  • Variable names must begin with a letter, the $ character, or the underscore character
lamp Both JavaScript statements and JavaScript variables are case-sensitive.


Declaring (Creating) JavaScript Variables

Creating a variable in JavaScript is most often referred to as "declaring" a variable.
You declare JavaScript variables with the var keyword:
var carname;
After the declaration, the variable is empty (it has no value).
To assign a value to the variable, use the equal sign:

carname="Volvo"; 

However, you can also assign a value to the variable when you declare it:
 
var carname="Volvo";

In the example below we create a variable called carname, assigns the value "Volvo" to it, and put the value inside the HTML paragraph with id="demo":

Example

<p id="demo"></p>
var carname="Volvo";
document.getElementById("demo").innerHTML=carname;


lamp It's a good programming practice to declare all the variables you will need, in one place, at the beginning of your code.


JavaScript Data Types

There are many types of JavaScript variables, but for now, just think of two types: text and numbers.
When you assign a text value to a variable, put double or single quotes around the value.
When you assign a numeric value to a variable, do not put quotes around the value. If you put quotes around a numeric value, it will be treated as text.

One Statement, Many Variables

You can declare many variables in one statement. Just start the statement with var and separate the variables by comma:

var name="Doe", age=30, job="carpenter"; 
 
Your declaration can also span multiple lines:

var name="Doe",
age=30,
job="carpenter";


Value = undefined

In computer programs, variables are often declared without a value. The value can be something that has to be calculated, or something that will be provided later, like user input. Variable declared without a value will have the value undefined.
The variable carname will have the value undefined after the execution of the following statement:
var carname;


Re-Declaring JavaScript Variables

If you re-declare a JavaScript variable, it will not lose its value:.
The value of the variable carname will still have the value "Volvo" after the execution of the following two statements:
var carname="Volvo";
var carname;


JavaScript Arithmetic

As with algebra, you can do arithmetic with JavaScript variables, using operators like = and +:

Example

y=5;
x=y+2;


You will learn more about JavaScript operators in a later chapter of this tutorial.

JavaScript Statements

JavaScript Statements

JavaScript statements are "commands" to the browser. The purpose of the statements is to tell the browser what to do.
This JavaScript statement tells the browser to write "Hello Dolly" inside an HTML element with id="demo":

document.getElementById("demo").innerHTML="Hello Dolly";


Semicolon ;

Semicolon separates JavaScript statements.
Normally you add a semicolon at the end of each executable statement.
Using semicolons also makes it possible to write many statements on one line.
lamp Ending statements with semicolon is optional in JavaScript. You might see examples without semicolons.


JavaScript Code

JavaScript code (or just JavaScript) is a sequence of JavaScript statements.
Each statement is executed by the browser in the sequence they are written.
This example will manipulate two HTML elements:

Example

document.getElementById("demo").innerHTML="Hello Dolly";
document.getElementById("myDIV").innerHTML="How are you?";


JavaScript Code Blocks

JavaScript statements can be grouped together in blocks.
Blocks start with a left curly bracket, and end with a right curly bracket.
The purpose of a block is to make the sequence of statements execute together.
A good example of statements grouped together in blocks, are JavaScript functions.
This example will run a function that will manipulate two HTML elements:

Example

function myFunction()
{
document.getElementById("demo").innerHTML="Hello Dolly";
document.getElementById("myDIV").innerHTML="How are you?";
}


You will learn more about functions in later chapters.

JavaScript is Case Sensitive

JavaScript is case sensitive.
Watch your capitalization closely when you write JavaScript statements:
A function getElementById is not the same as getElementbyID.

A variable named myVariable is not the same as MyVariable.

White Space

JavaScript ignores extra spaces. You can add white space to your script to make it more readable. The following lines are equivalent:
var name="Hege";
var name = "Hege";


Break up a Code Line

You can break up a code line within a text string with a backslash. The example below will be displayed properly:
document.write("Hello \
World!");
However, you cannot break up a code line like this:
document.write \
("Hello World!");

Sabtu, 29 September 2012

JavaScript Objects

JavaScript Objects

JavaScript has several built-in objects, like String, Date, Array, and more.
An object is just a special kind of data, with properties and methods.

Objects Properties

Properties are the values associated with an object.
The syntax for accessing the property of an object is:

objectName.propertyName

This example uses the length property of the String object to find the length of a string:

var message="Hello World!";
var x=message.length;

The value of x, after execution of the code above will be:

12

Real Life Illustration

A person is an object.
The persons' properties include name, height, weight, age, skin tone, eye color, etc.
All persons have these properties, but the values of those properties differ from person to person.

Objects Have Methods

Methods are the actions that can be performed on objects.
You can call a method with the following syntax:

objectName.methodName()

This example uses the toUpperCase() method of the String object, to convert a text to uppercase:

var message="Hello world!";
var x=message.toUpperCase();

The value of x, after execution of the code above will be:

HELLO WORLD!

Real Life Illustration

A person is an object.
The persons' methods could be eat(), sleep(), work(), play(), etc.
All persons have these methods.

Creating JavaScript Objects

With JavaScript you can define and create your own objects.
There are 2 different ways to create a new object:
  • 1. Define and create a direct instance of an object.
  • 2. Use a function to define an object, then create new object instances.

Creating a Direct Instance

This example creates a new instance of an object, and adds four properties to it:
personObj=new Object();
personObj.firstname="John";
personObj.lastname="Doe";
personObj.age=50;
personObj.eyecolor="blue";
Alternative syntax (using object literals):

Example

personObj={firstname:"John",lastname:"Doe",age:50,eyecolor:"blue"};


Using an Object Constructor

This example uses a function to construct the object:

Example

function person(firstname,lastname,age,eyecolor)
{
this.firstname=firstname;
this.lastname=lastname;
this.age=age;
this.eyecolor=eyecolor;
}

The reason for all the "this" stuff is that you're going to have more than one person at a time (which person you're dealing with must be clear). That's what "this" is: the instance of the object at hand.

Adding Methods to JavaScript Objects

Methods are just functions attached to objects.
Defining methods to an object is done inside the constructor function:
function person(firstname,lastname,age,eyecolor)
{
this.firstname=firstname;
this.lastname=lastname;
this.age=age;
this.eyecolor=eyecolor;

this.changeName=changeName;

function changeName(name)
{
this.lastname=name;
}
}
The changeName() function assigns the value of name to the person's lastname property.

Now You Can Try:

myMother.changeName("Doe");

JavaScript knows which person you are talking about by "substituting" this with myMother.

Creating JavaScript Object Instances

Once you have a object constructor, you can create new instances of the object, like this:
var myFather=new person("John","Doe",50,"blue");
var myMother=new person("Sally","Rally",48,"green");


Adding Properties to JavaScript Objects

You can add new properties to an existing object by simply giving it a value.
Assume that the personObj already exists - you can give it new properties named firstname, lastname, age, and eyecolor as follows:


The value of x, after execution of the code above will be:

CSS Padding

Padding

The padding clears an area around the content (inside the border) of an element. The padding is affected by the background color of the element.
The top, right, bottom, and left padding can be changed independently using separate properties. A shorthand padding property can also be used, to change all paddings at once.

Possible Values

Value Description
length Defines a fixed padding (in pixels, pt, em, etc.)
% Defines a padding in % of the containing element


Padding - Individual sides

In CSS, it is possible to specify different padding for different sides:

Example

padding-top:25px;
padding-bottom:25px;
padding-right:50px;
padding-left:50px;


Padding - Shorthand property

To shorten the code, it is possible to specify all the padding properties in one property. This is called a shorthand property.
The shorthand property for all the padding properties is "padding":

Example

padding:25px 50px;


The padding property can have from one to four values.
  • padding:25px 50px 75px 100px;
    • top padding is 25px
    • right padding is 50px
    • bottom padding is 75px
    • left padding is 100px

  • padding:25px 50px 75px;
    • top padding is 25px
    • right and left paddings are 50px
    • bottom padding is 75px

  • padding:25px 50px;
    • top and bottom paddings are 25px
    • right and left paddings are 50px

  • padding:25px;
    • all four paddings are 25px


All CSS Padding Properties


CSS Margin

Margin

The margin clears an area around an element (outside the border). The margin does not have a background color, and is completely transparent.
The top, right, bottom, and left margin can be changed independently using separate properties. A shorthand margin property can also be used, to change all margins at once.

Possible Values

Value Description
auto The browser calculates a margin
length Specifies a margin in px, pt, cm, etc. Default value is 0px
% Specifies a margin in percent of the width of the containing element
inherit Specifies that the margin should be inherited from the parent element
 It is possible to use negative values, to overlap content.

Margin - Individual sides

In CSS, it is possible to specify different margins for different sides:

Example

margin-top:100px;
margin-bottom:100px;
margin-right:50px;
margin-left:50px;


Margin - Shorthand property

To shorten the code, it is possible to specify all the margin properties in one property. This is called a shorthand property.
The shorthand property for all the margin properties is "margin":

Example

margin:100px 50px;


The margin property can have from one to four values.
  • margin:25px 50px 75px 100px;
    • top margin is 25px
    • right margin is 50px
    • bottom margin is 75px
    • left margin is 100px

  • margin:25px 50px 75px;
    • top margin is 25px
    • right and left margins are 50px
    • bottom margin is 75px

  • margin:25px 50px;
    • top and bottom margins are 25px
    • right and left margins are 50px

  • margin:25px;
    • all four margins are 25px


All CSS Margin Properties


CSS Box Model

The CSS Box Model

All HTML elements can be considered as boxes. In CSS, the term "box model" is used when talking about design and layout.
The CSS box model is essentially a box that wraps around HTML elements, and it consists of: margins, borders, padding, and the actual content.
The box model allows us to place a border around elements and space elements in relation to other elements.
The image below illustrates the box model:

CSS box-model 
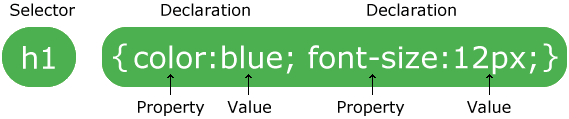
Explanation of the different parts:
  • Margin - Clears an area around the border. The margin does not have a background color, it is completely transparent
  • Border - A border that goes around the padding and content. The border is affected by the background color of the box
  • Padding - Clears an area around the content. The padding is affected by the background color of the box
  • Content - The content of the box, where text and images appear
In order to set the width and height of an element correctly in all browsers, you need to know how the box model works.

Width and Height of an Element

Remark 
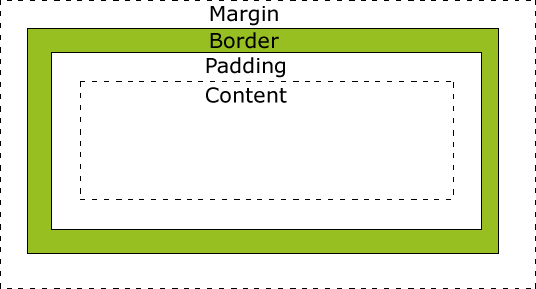
Important: When you set the width and height properties of an element with CSS, you just set the width and height of the content area. To calculate the full size of an element, you must also add the padding, borders and margins.
The total width of the element in the example below is 300px:
width:250px;
padding:10px;
border:5px solid gray;
margin:10px;
Let's do the math:
250px (width)
+ 20px (left and right padding)
+ 10px (left and right border)
+ 20px (left and right margin)
= 300px
Assume that you had only 250px of space. Let's make an element with a total width of 250px:

Example

width:220px;
padding:10px;
border:5px solid gray;
margin:0px;


The total width of an element should be calculated like this:
Total element width = width + left padding + right padding + left border + right border + left margin + right margin
The total height of an element should be calculated like this:
Total element height = height + top padding + bottom padding + top border + bottom border + top margin + bottom margin

Browsers Compatibility Issue

IE8 and earlier versions of IE, included padding and border in the width property.
To fix this problem, add a <!DOCTYPE html> to the HTML page.

CSS Styling Tables

The look of an HTML table can be greatly improved with CSS:


Table Borders

To specify table borders in CSS, use the border property.
The example below specifies a black border for table, th, and td elements:

Example

table, th, td
{
border: 1px solid black;
}


Notice that the table in the example above has double borders. This is because both the table and the th/td elements have separate borders.
To display a single border for the table, use the border-collapse property.

Collapse Borders

The border-collapse property sets whether the table borders are collapsed into a single border or separated:

Example

table
{
border-collapse:collapse;
}
table,th, td
{
border: 1px solid black;
}


Table Width and Height

Width and height of a table is defined by the width and height properties.
The example below sets the width of the table to 100%, and the height of the th elements to 50px:

Example

table
{
width:100%;
}
th
{
height:50px;
}


Table Text Alignment

The text in a table is aligned with the text-align and vertical-align properties.
The text-align property sets the horizontal alignment, like left, right, or center:

Example

td
{
text-align:right;
}


The vertical-align property sets the vertical alignment, like top, bottom, or middle:

Example

td
{
height:50px;
vertical-align:bottom;
}


Table Padding

To control the space between the border and content in a table, use the padding property on td and th elements:

Example

td
{
padding:15px;
}


Table Color

The example below specifies the color of the borders, and the text and background color of th elements:

Example

table, td, th
{
border:1px solid green;
}
th
{
background-color:green;
color:white;
}

CSS Styling Font

CSS Font Families

In CSS, there are two types of font family names:
  • generic family - a group of font families with a similar look (like "Serif" or "Monospace")
  • font family - a specific font family (like "Times New Roman" or "Arial")
Generic family Font family Description
Serif Times New Roman
Georgia
Serif fonts have small lines at the ends on some characters
Sans-serif Arial
Verdana
"Sans" means without - these fonts do not have the lines at the ends of characters
Monospace Courier New
Lucida Console
All monospace characters have the same width


Font Family

The font family of a text is set with the font-family property.
The font-family property should hold several font names as a "fallback" system. If the browser does not support the first font, it tries the next font.
Start with the font you want, and end with a generic family, to let the browser pick a similar font in the generic family, if no other fonts are available.
Note: If the name of a font family is more than one word, it must be in quotation marks, like font-family: "Times New Roman".
More than one font family is specified in a comma-separated list:

Example

p{font-family:"Times New Roman", Times, serif;}


Font Style

The font-style property is mostly used to specify italic text.
This property has three values:
  • normal - The text is shown normally
  • italic - The text is shown in italics
  • oblique - The text is "leaning" (oblique is very similar to italic, but less supported)

Example

p.normal {font-style:normal;}
p.italic {font-style:italic;}
p.oblique {font-style:oblique;}


Font Size

The font-size property sets the size of the text.
Being able to manage the text size is important in web design. However, you should not use font size adjustments to make paragraphs look like headings, or headings look like paragraphs.
Always use the proper HTML tags, like <h1> - <h6> for headings and <p> for paragraphs.
The font-size value can be an absolute, or relative size.
Absolute size:
  • Sets the text to a specified size
  • Does not allow a user to change the text size in all browsers (bad for accessibility reasons)
  • Absolute size is useful when the physical size of the output is known
Relative size:
  • Sets the size relative to surrounding elements
  • Allows a user to change the text size in browsers
If you do not specify a font size, the default size for normal text, like paragraphs, is 16px (16px=1em).

Set Font Size With Pixels

Setting the text size with pixels gives you full control over the text size:

Example

h1 {font-size:40px;}
h2 {font-size:30px;}
p {font-size:14px;}


The example above allows Internet Explorer 9, Firefox, Chrome, Opera, and Safari to resize the text.
Note: The example above does not work in IE, prior version 9.
The text can be resized in all browsers using the zoom tool (however, this resizes the entire page, not just the text).

Set Font Size With Em

To avoid the resizing problem with older versions of Internet Explorer, many developers use em instead of pixels.
The em size unit is recommended by the rickyrizkys.
1em is equal to the current font size. The default text size in browsers is 16px. So, the default size of 1em is 16px.
The size can be calculated from pixels to em using this formula: pixels/16=em

Example

h1 {font-size:2.5em;} /* 40px/16=2.5em */
h2 {font-size:1.875em;} /* 30px/16=1.875em */
p {font-size:0.875em;} /* 14px/16=0.875em */


In the example above, the text size in em is the same as the previous example in pixels. However, with the em size, it is possible to adjust the text size in all browsers.
Unfortunately, there is still a problem with older versions of IE. The text becomes larger than it should when made larger, and smaller than it should when made smaller.

Use a Combination of Percent and Em

The solution that works in all browsers, is to set a default font-size in percent for the <body> element:

Example

body {font-size:100%;}
h1 {font-size:2.5em;}
h2 {font-size:1.875em;}
p {font-size:0.875em;}


Our code now works great! It shows the same text size in all browsers, and allows all browsers to zoom or resize the text!


All CSS Font Properties


CSS Styling Text

Text Alignment

The text-align property is used to set the horizontal alignment of a text.
Text can be centered, or aligned to the left or right, or justified.
When text-align is set to "justify", each line is stretched so that every line has equal width, and the left and right margins are straight (like in magazines and newspapers).

Example

h1 {text-align:center;}
p.date {text-align:right;}
p.main {text-align:justify;} 

Text Decoration

The text-decoration property is used to set or remove decorations from text.
The text-decoration property is mostly used to remove underlines from links for design purposes:

Example

a {text-decoration:none;}


It can also be used to decorate text:

Example

h1 {text-decoration:overline;}
h2 {text-decoration:line-through;}
h3 {text-decoration:underline;}
h4 {text-decoration:blink;}


 It is not recommended to underline text that is not a link, as this often confuses users.

Text Transformation

The text-transform property is used to specify uppercase and lowercase letters in a text.
It can be used to turn everything into uppercase or lowercase letters, or capitalize the first letter of each word.

Example

p.uppercase {text-transform:uppercase;}
p.lowercase {text-transform:lowercase;}
p.capitalize {text-transform:capitalize;}


Text Indentation

The text-indentation property is used to specify the indentation of the first line of a text.

Example

p {text-indent:50px;} 


All CSS Text Properties


CSS Styling Background

Background Color

The background-color property specifies the background color of an element.
The background color of a page is defined in the body selector:

Example

body {background-color:#b0c4de;}


With CSS, a color is most often specified by:
  • a HEX value - like "#ff0000"
  • an RGB value - like "rgb(255,0,0)"
  • a color name - like "red"
Look at CSS Color Values for a complete list of possible color values.
In the example below, the h1, p, and div elements have different background colors:

Example

h1 {background-color:#6495ed;}
p {background-color:#e0ffff;}
div {background-color:#b0c4de;}


Background Image

The background-image property specifies an image to use as the background of an element.
By default, the image is repeated so it covers the entire element.
The background image for a page can be set like this:

Example

body {background-image:url('paper.gif');}


Below is an example of a bad combination of text and background image. The text is almost not readable:

Example

body {background-image:url('bgdesert.jpg');}


Background Image - Repeat Horizontally or Vertically

By default, the background-image property repeats an image both horizontally and vertically.
Some images should be repeated only horizontally or vertically, or they will look strange, like this: 

Example

body
{
background-image:url('gradient2.png');
}


If the image is repeated only horizontally (repeat-x), the background will look better:

Example

body
{
background-image:url('gradient2.png');
background-repeat:repeat-x;
}


Background Image - Set position and no-repeat

Remark When using a background image, use an image that does not disturb the text.
Showing the image only once is specified by the background-repeat property:

Example

body
{
background-image:url('img_tree.png');
background-repeat:no-repeat;
}


In the example above, the background image is shown in the same place as the text. We want to change the position of the image, so that it does not disturb the text too much.
The position of the image is specified by the background-position property:

Example

body
{
background-image:url('img_tree.png');
background-repeat:no-repeat;
background-position:right top;
}


Background - Shorthand property

As you can see from the examples above, there are many properties to consider when dealing with backgrounds.
To shorten the code, it is also possible to specify all the properties in one single property. This is called a shorthand property.
The shorthand property for background is simply "background":

Example

body {background:#ffffff url('img_tree.png') no-repeat right top;}


When using the shorthand property the order of the property values is:
  • background-color
  • background-image
  • background-repeat
  • background-attachment
  • background-position
It does not matter if one of the property values is missing, as long as the ones that are present are in this order.

All CSS Background Properties


CSS Id and Class

The id and class Selectors

In addition to setting a style for a HTML element, CSS allows you to specify your own selectors called "id" and "class".

The id Selector

The id selector is used to specify a style for a single, unique element.
The id selector uses the id attribute of the HTML element, and is defined with a "#".
The style rule below will be applied to the element with id="para1":

Example

#para1
{
text-align:center;
color:red;
}


Remark Do NOT start an ID name with a number! It will not work in Mozilla/Firefox.

The class Selector

The class selector is used to specify a style for a group of elements. Unlike the id selector, the class selector is most often used on several elements.
This allows you to set a particular style for many HTML elements with the same class.
The class selector uses the HTML class attribute, and is defined with a "."
In the example below, all HTML elements with class="center" will be center-aligned:

Example

.center {text-align:center;}


You can also specify that only specific HTML elements should be affected by a class.
In the example below, all p elements with class="center" will be center-aligned:

Example

p.center {text-align:center;}

CSS Syntax

CSS Syntax

A CSS rule has two main parts: a selector, and one or more declarations:

The selector is normally the HTML element you want to style.
Each declaration consists of a property and a value.
The property is the style attribute you want to change. Each property has a value.

CSS Example

A CSS declaration always ends with a semicolon, and declaration groups are surrounded by curly brackets:
p {color:red;text-align:center;}
To make the CSS more readable, you can put one declaration on each line, like this:

Example

p
{
color:red;
text-align:center;
}


CSS Comments

Comments are used to explain your code, and may help you when you edit the source code at a later date. Comments are ignored by browsers.
A CSS comment begins with "/*", and ends with "*/", like this:
/*This is a comment*/
p
{
text-align:center;
/*This is another comment*/
color:black;
font-family:arial;
}

CSS Introduction

What You Should Already Know

Before you continue you should have a basic understanding of the following:
  • HTML / XHTML


What is CSS?

  • CSS stands for Cascading Style Sheets
  • Styles define how to display HTML elements
  • Styles were added to HTML 4.0 to solve a problem
  • External Style Sheets can save a lot of work
  • External Style Sheets are stored in CSS files

CSS Demo

An HTML document can be displayed with different styles:

Styles Solved a Big Problem

HTML was never intended to contain tags for formatting a document.
HTML was intended to define the content of a document, like:
<h1>This is a heading</h1>
<p>This is a paragraph.</p>
When tags like <font>, and color attributes were added to the HTML 3.2 specification, it started a nightmare for web developers. Development of large web sites, where fonts and color information were added to every single page, became a long and expensive process.
To solve this problem, the World Wide Web Consortium (W3C) created CSS.
In HTML 4.0, all formatting could be removed from the HTML document, and stored in a separate CSS file.
All browsers support CSS today.

CSS Saves a Lot of Work!

CSS defines HOW HTML elements are to be displayed.
Styles are normally saved in external .css files. External style sheets enable you to change the appearance and layout of all the pages in a Web site, just by editing one single file!


Jumat, 28 September 2012

HTML Blocks

HTML Block Elements

Most HTML elements are defined as block level elements or as inline elements.
Block level elements normally start (and end) with a new line when displayed in a browser.
Examples: <h1>, <p>, <ul>, <table>

HTML Inline Elements

Inline elements are normally displayed without starting a new line.
Examples: <b>, <td>, <a>, <img>

The HTML <div> Element

The HTML <div> element is a block level element that can be used as a container for grouping other HTML elements.
 The <div> element has no special meaning. Except that, because it is a block level element, the browser will display a line break before and after it.
When used together with CSS, the <div> element can be used to set style attributes to large blocks of content.
Another common use of the <div> element, is for document layout. It replaces the "old way" of defining layout using tables. Using tables is not the correct use of the <table> element. The purpose of the <table> element is to display tabular data.

The HTML <span> Element

The HTML <span> element is an inline element that can be used as a container for text.
The <span> element has no special meaning.
When used together with CSS, the <span> element can be used to set style attributes to parts of the text.

HTML Grouping Tags


HTML Iframes

Syntax for adding an iframe:

<iframe src="URL"></iframe> 
 
The URL points to the location of the separate page.

Iframe - Set Height and Width

The height and width attributes are used to specify the height and width of the iframe.
The attribute values are specified in pixels by default, but they can also be in percent (like "80%").

Example

<iframe src="demo_iframe.htm" width="200" height="200"></iframe>


Iframe - Remove the Border

The frameborder attribute specifies whether or not to display a border around the iframe.
Set the attribute value to "0" to remove the border:

Example

<iframe src="demo_iframe.htm" frameborder="0"></iframe>


Use iframe as a Target for a Link

An iframe can be used as the target frame for a link.
The target attribute of a link must refer to the name attribute of the iframe:

Example

<iframe src="demo_iframe.htm" name="iframe_a"></iframe>
<p><a href="http://rickyrizkys.blogspot.com" target="iframe_a">rickyrizkys</a></p>


HTML iframe Tag


HTML Image

HTML Images - The <img> Tag and the Src Attribute

In HTML, images are defined with the <img> tag. 
The <img> tag is empty, which means that it contains attributes only, and has no closing tag.
To display an image on a page, you need to use the src attribute. Src stands for "source". The value of the src attribute is the URL of the image you want to display.

Syntax for defining an image:
<img src="url" alt="some_text"> 
 
The URL points to the location where the image is stored. An image named "boat.gif", located in the "images" directory on "www.w3schools.com" has the URL: http://www.w3schools.com/images/boat.gif.
The browser displays the image where the <img> tag occurs in the document. If you put an image tag between two paragraphs, the browser shows the first paragraph, then the image, and then the second paragraph.

HTML Images - The Alt Attribute

The required alt attribute specifies an alternate text for an image, if the image cannot be displayed.
The value of the alt attribute is an author-defined text:

<img src="boat.gif" alt="Big Boat">
 
The alt attribute provides alternative information for an image if a user for some reason cannot view it (because of slow connection, an error in the src attribute, or if the user uses a screen reader).

HTML Images - Set Height and Width of an Image

The height and width attributes are used to specify the height and width of an image.
The attribute values are specified in pixels by default:

<img src="pulpit.jpg" alt="Pulpit rock" width="304" height="228">
 
Tip: It is a good practice to specify both the height and width attributes for an image. If these attributes are set, the space required for the image is reserved when the page is loaded. However, without these attributes, the browser does not know the size of the image. The effect will be that the page layout will change during loading (while the images load).

Basic Notes - Useful Tips

Note: If an HTML file contains ten images - eleven files are required to display the page right. Loading images takes time, so my best advice is: Use images carefully.
Note: When a web page is loaded, it is the browser, at that moment, that actually gets the image from a web server and inserts it into the page. Therefore, make sure that the images actually stay in the same spot in relation to the web page, otherwise your visitors will get a broken link icon. The broken link icon is shown if the browser cannot find the image.


HTML Image Tags

Kamis, 27 September 2012

HTML TABEL

HTML Tables

Tables are defined with the <table> tag.
A table is divided into rows (with the <tr> tag), and each row is divided into data cells (with the <td> tag). td stands for "table data," and holds the content of a data cell. A <td> tag can contain text, links, images, lists, forms, other tables, etc.

Table Example

<table border="1">
<tr>
<td>row 1, cell 1</td>
<td>row 1, cell 2</td>
</tr>
<tr>
<td>row 2, cell 1</td>
<td>row 2, cell 2</td>
</tr>
</table> 

How the HTML code above looks in a browser:
row 1, cell 1 row 1, cell 2
row 2, cell 1 row 2, cell 2


HTML Tables and the Border Attribute

If you do not specify a border attribute, the table will be displayed without borders. Sometimes this can be useful, but most of the time, we want the borders to show.
To display a table with borders, specify the border attribute:
<table border="1">
<tr>
<td>Row 1, cell 1</td>
<td>Row 1, cell 2</td>
</tr>
</table>


HTML Table Headers

Header information in a table are defined with the <th> tag.
All major browsers display the text in the <th> element as bold and centered.
<table border="1">
<tr>
<th>Header 1</th>
<th>Header 2</th>
</tr>
<tr>
<td>row 1, cell 1</td>
<td>row 1, cell 2</td>
</tr>
<tr>
<td>row 2, cell 1</td>
<td>row 2, cell 2</td>
</tr>
</table>
How the HTML code above looks in your browser:


Header 1Header 2
row 1, cell 1row 1, cell 2
row 2, cell 1row 2, cell 2


HTML Table Tags


HTML Elements


HTML Elements

HTML documents are defined by HTML elements.

HTML Elements 

An HTML element is everything from the start tag to the end tag: 


* The start tag is often called the opening tag. The end tag is often called the closing tag.

HTML Element Syntax

  • An HTML element starts with a start tag / opening tag
  • An HTML element ends with an end tag / closing tag
  • The element content is everything between the start and the end tag
  • Some HTML elements have empty content
  • Empty elements are closed in the start tag
  • Most HTML elements can have attributes
Tip: You will learn about attributes in the next chapter of this tutorial.

Nested HTML Elements

Most HTML elements can be nested (can contain other HTML elements).
HTML documents consist of nested HTML elements.

HTML Document Example

The example above contains 3 HTML elements.

HTML Example Explained

The <p> element:


The <p> element defines a paragraph in the HTML document.
The element has a start tag <p> and an end tag </p>.
The element content is: This is my first paragraph.

The <body> element:

The <body> element defines the body of the HTML document.
The element has a start tag <body> and an end tag </body>.
The element content is another HTML element (a p element).

The <html> element:

The <html> element defines the whole HTML document.
The element has a start tag <html> and an end tag </html>.
The element content is another HTML element (the body element).

Don't Forget the End Tag

Some HTML elements might display correctly even if you forget the end tag:


The example above works in most browsers, because the closing tag is considered optional.
Never rely on this. Many HTML elements will produce unexpected results and/or errors if you forget the end tag .

Empty HTML Elements

HTML elements with no content are called empty elements.
<br> is an empty element without a closing tag (the <br> tag defines a line break).
Tip: In XHTML, all elements must be closed. Adding a slash inside the start tag, like <br />, is the proper way of closing empty elements in XHTML (and XML).

HTML Tip: Use Lowercase Tags

HTML tags are not case sensitive: <P> means the same as <p>. Many web sites use uppercase HTML tags.